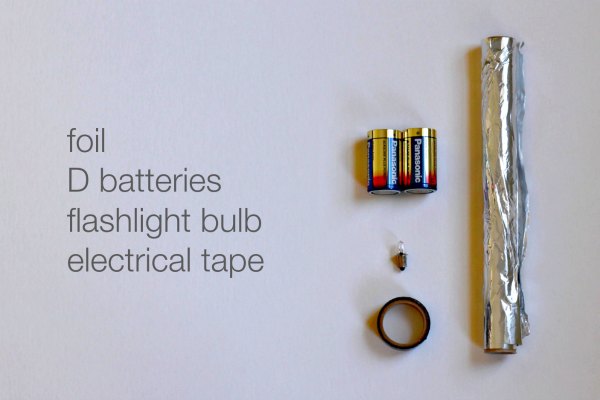
What you need:
- 1-2 D batteries. You can use one, but will get more impressive results with two.
- Aluminum foil.
- Electrical tape. Hmmm. This could qualify as a specialty item, but since I actually had some, chances are you will too.
- A light bulb from a flashlight. I can’t consider this a specialty item. If you don’t actually have a flashlight, you need to buy one.
- Enthusiastic scientists.
Instructions (single battery):
Cut the foil in long strips. Ours were 12 inches by 2 inches. Fold up into thin strips. Smooshing and pinching is fine. No need for it to be perfect.
Use a small piece of tape to secure the foil strip the metal ring around the light bulb. At the base of the light bulb is a metal tip (where the bulb makes contact in the flashlight), do not let this piece of foil touch that tip.
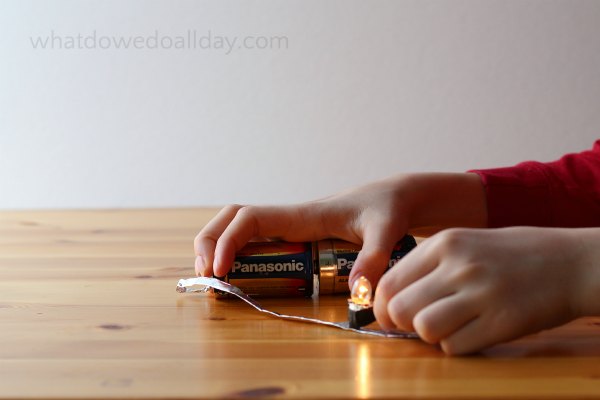
Tape the other end of the same foil strip to the negative end of the battery. Be sure the foil is covering the center of the battery end.
Tape the other foil strip to the other end of the battery, again ensuring the foil covers the center of the battery end.
Touch the free end of the second foil strip to the metal tip of the bulb, making sure NOT to touch the other piece of foil.
Watch our ADORABLE video:
Two battery variation (pictured):
Tape the second foil strip to the positive end of the second battery.
Press the free battery ends together. Hard.
Discuss how and why the two battery version produces a different result from the single battery project.
We tried taping the batteries together, but there wasn’t enough pressure to complete the circuit. It’s easier if one person holds the batteries together while the other person touches the foil to the bulb.
What is happening?
The foil acts as simple conduit from the power source — the battery — to the bulb. (Um, hope I got that right!) The foil and power source are fairly weak so they can only power a small bulb. But still, it’s a quite satisfying simple circuit science project, especially for a six year old.